Setting up a modern surveillance system is one of the most effective ways to protect your property and family.
Whether you are a business owner or a homeowner, understanding how to install CCTV camera hardware correctly
ensures your system is reliable, compliant, and future-ready.
This professional 2026 technical blueprint explains how to install security cameras for both residential
apartments and complex corporate office environments.
1. Planning: The Strategic Blueprint
Before picking up a drill, you must determine how to install camera system components to maximize coverage
based on your building type.
For Corporate Office Buildings
Mandatory Zones: Reception desks (Recognition View), server rooms, and all emergency exits
must be covered for asset protection and liability control.
Elevator Lobbies: As per SIRA 2026 standards, cameras are required in elevator lobbies
on every floor to track floor-to-floor movement.
For Residential Apartments & Towers
Entry & Exit Points: High-definition cameras must be installed at all entrances to
provide Identification View footage.
Parking & ANPR: Buildings with 50+ units require SIRA Approved ANPR cameras at
parking entry points.
Communal Areas: Gyms, swimming pools, corridors, and lobbies must be monitored to
ensure resident safety.
2. Tools and Equipment Checklist
To correctly follow this guide on how to install CCTV camera at home or in an office, ensure you have the
following 2026 essentials:
SIRA Approved Hardware: Certified IP cameras (Hikvision, Axis, etc.) to ensure compliance.
Storage: Surveillance-grade HDDs with at least 31 days of video retention.
Cabling: Cat6 Ethernet cables for PoE systems, ensuring stable power and data transfer.
Smart Hub (NVR): Network Video Recorder with 20% spare capacity for future expansion.
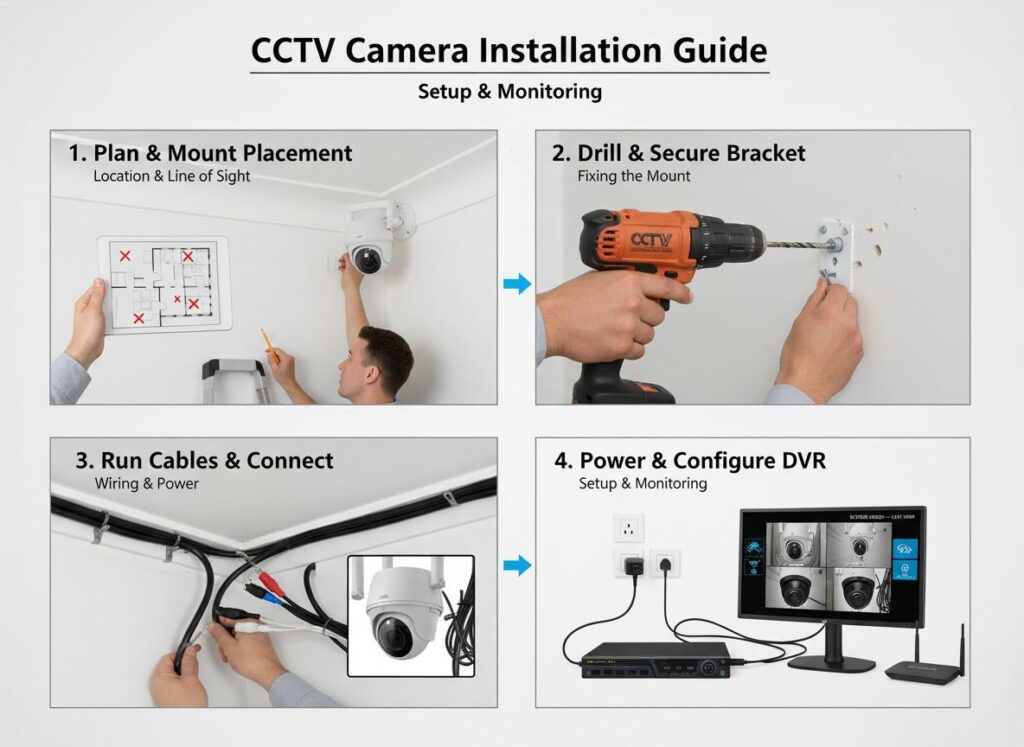
3. Step-by-Step Installation Guide
Step 1: Mounting the Hardware
Use the manufacturer’s mounting template to mark drill points accurately. Cameras must be visible (not hidden)
and mounted between 8 to 10 feet for optimal facial recognition as per SIRA regulations.
Step 2: Routing the Cables
Corporate Setup: Route cables through false ceilings or conduits to maintain a clean,
professional appearance.
Apartment Setup: Label cables at both ends to simplify future maintenance by your
SIRA provider.
Step 3: Connecting to the NVR (Smart Hub)
Connect each Cat6 cable to the PoE ports on the NVR. Larger installations may require a PoE switch to handle
high camera volumes efficiently.
Step 4: System Configuration
VideoGuard (VGS) Link: Ensure the system is connected to the SIRA monitoring platform
for compliance.
Privacy Masking: Configure cameras to avoid private balconies or neighboring windows.
4. Maintenance Best Practices
After learning how to install CCTV camera at home or in a business environment, regular maintenance is critical:
Clean Lenses: Use a microfiber cloth every few months to remove dust and debris.
Check Storage: Confirm the hard drive overwrites old footage without errors.
Firmware Updates: Keep software updated to maintain security and performance.
Important for Dubai Businesses
While DIY installation is common for residential properties, commercial buildings in Dubai must have CCTV
systems installed by a SIRA Approved CCTV company.
SOS Technology ensures full compliance with local laws, seamless SIRA inspections,
and long-term system reliability.